
THE CHAIR

The initial inspiration to re-upholster a chair came from Pintrest. Search for “Quilted Furniture” and see what I mean. I saw a whole world of potential quilted furniture and I wanted to learn how to do it. I hatched out a plan for some one-on-one instruction.
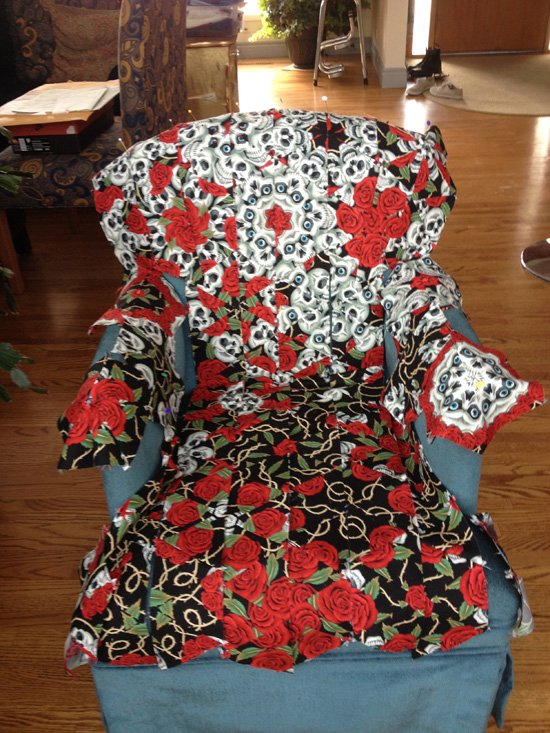
I now needed to create the fabric/quilt with which to reupholster the chair with. I had some one-block wonder squares started with skulls and roses. What if I started laying out the blocks on the chair? I was excited by what was happening! It was a crazy idea, but fun. The chair became my design wall and I placed the blocks, blending the colors as I went.

Lesson 1: Stripping the fabric from the chair.
You turn the chair upside down. Who knew? There are lots of specialty tools to assist you in this as there are hundreds of staples used. You need to remove all of them. This was the grunt work part.
View fullsize
The old removed fabric now becomes the patterns needed to shape the new pieces. I overlaid my new designs on top and sewed them together as individual pieces. I then sent these pieces along with the batting and a thin cotton backing to a long arm quilter for quilting. She used an invisible nylon thread as I didn’t want the stitching to show, I wanted the fabric to speak loudly.

Lesson 2: Reupholstering the chair.
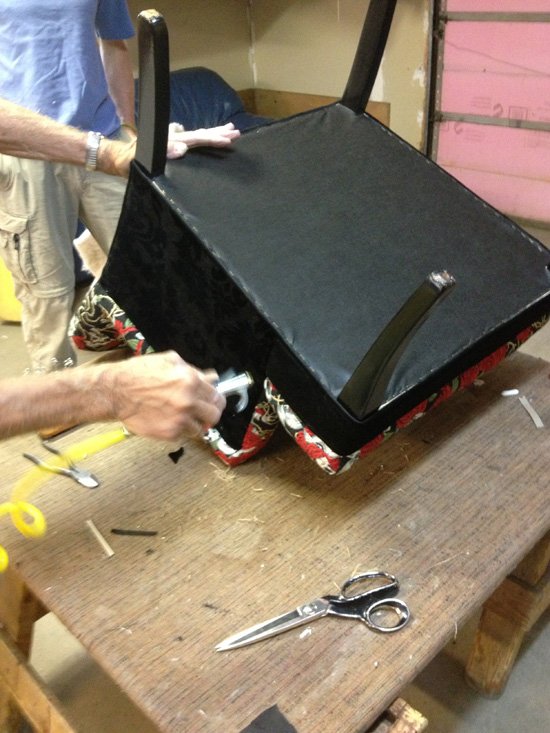
Once my quilted pieces were back from the quilter (Corinne Johnson) I brought my chair and my husband Brent to re-upholsterer (Bert Kroes) who let me watch and Brent help (as much as he’d allow it - he’s a perfectionist!) Bert works out of his garage in Killarney. He started with the seat, taking the old padding off the chair except the seat padding and adding a bit more stuffing to boost the old stuff. With masterful technique, he staples and cuts the fabric in just the right places to wrap tightly around the chair frame. He has a pneumatic staple gun that makes it look easy. He also works with the grace and skill of someone who’d been doing this for many years.
Lesson 3: Finishing.
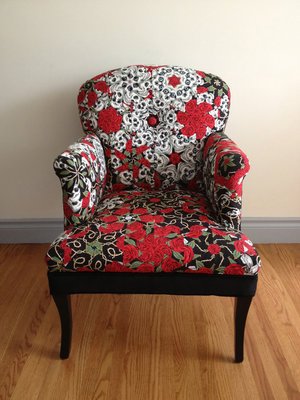
The next day Brent and I are back to help and watch the master. The arm fabric goes back on with extra added padding. Using a needle and thread the front of the arms are invisibly stitched. The back is put in place with the design on the back exactly in the centre as I wanted it. I wanted to put a button in the centre of one block and Bert had a slick button maker and had it made in seconds. I helped with making the piping for around the back and bottom of the chair.
Voila! I would love to hear from you if you ever try it.
Feel free to email me for Bert’s or Corinne’s contact info.
Cheers,
Alison